
Why do this in the first place?
Put simply, I love Tomoe River paper. Ever since I got my hands on my first Hobonichi Techo, I’ve admired this thin, but ever so fountain pen-friendly paper. Although there seem to be a growing number of notebooks made using Tomoe River, these are generally not easy to come by in the UK. I recently took the plunge and ordered a couple of Nanami Paper’s Seven Seas notebooks – all the way from California. These are fairly expensive notebooks in their own right. Add in the cost of shipping from the US and these become a luxury rather than an everyday notebook.
There aren’t too many options for buying Tomoe River as loose sheets in the UK, but I managed to find a UK seller on eBay offering 300 sheets of Tomoe River paper for just under £30. So far, so good. After all, how hard can it be to make a notebook using ridiculously thin paper that creases easily?
Format
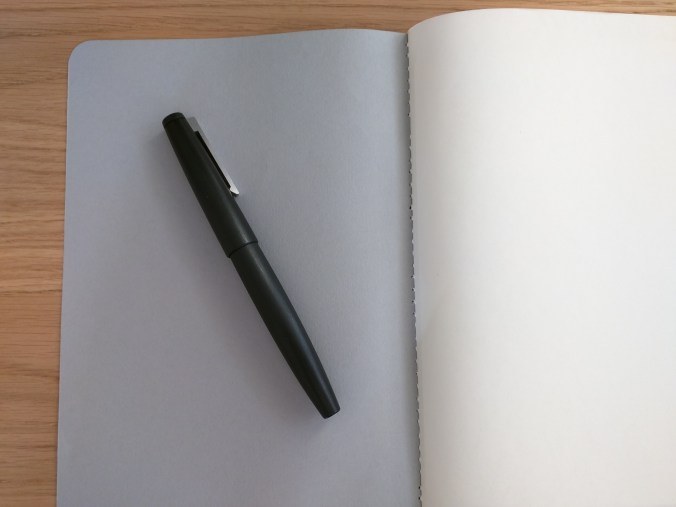
I made an A5 book, simply because I bought A4 paper and this meant the least amount of work in terms of folding and cutting. A5 also happens to be my format of choice, so it wasn’t such a hard decision. I also settled on a single signature exercise book, rather than a more complicated journal-type notebook. I’ve been experimenting with this type of book as inserts for my Start Bay Navigator.
I can never figure out how notebook makers count their pages. What I do know is that I used 24 sheets of A4, folded down, giving a total of 96 pages of A5 in the finished book.
Finish
The book contains plain paper, more out of necessity than choice. I tend to prefer dot grids, but the printable dot grids I’ve found on the web so far have been downright patchy in terms of the density of the dots. I’ve put together my own, but since Tomoe River paper doesn’t fare very well in your average printer this is somewhat moot. The seller that I got this paper from has now started selling 68gsm Tomoe River and I intend to see whether this will work any better in a printer.
Cover and Binding
In keeping with the exercise book theme, I went for a simple grey card cover (hence the title of the post and a bit of musical nostalgia – a 1986 album by the The Dream Syndicate).
I wanted a sewn binding, similar to the CIAK Appuntino I reviewed recently. From what I can find out, this is known as a Singer Sewn Binding (Made on a Singer sewing machine?), but I didn’t manage to find a handy diagram of the stitching pattern. Instead, I ended up more or less using backstitch. This gave the right appearance on the outside, but looks a bit messy on the inside.

After consultation with an embroidery and patchwork expert (my mum), I think the answer is to use a simple running stitch down the spine and then back up again. With an odd number of holes, this should give the same pattern inside and out, offset by one hole.
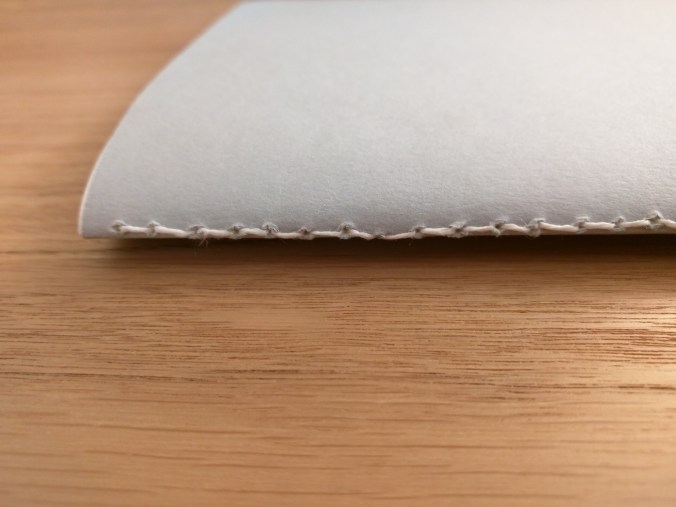
As you can see from the photos, the binding could have been straighter. I was drinking a gin and tonic as I made the notebook (Tanqueray Export if you must know), but that wasn’t the cause (honest!). I folded and clamped the pages before I marked out and punched the holes, so when I came to stitch the block of paper things weren’t as well aligned as I might have hoped. Next time out I’ll clamp the block and punch the binding holes before I fold the paper and cover.
Finishing
One of the consequences of stacking this many sheets of paper is that those in the middle of the book stick out further than those nearest the cover. To get a neat looking notebook, this means having to trim the edges. I used a steel rule and a craft knife and to be frank it got a little messy. Definitely something I need to practice at.
I used a 10mm corner punch to round the corners, and again I need a bit more practice to make these as neat as possible.
In use?
Overall, I’m quite pleased with the outcome. Sure, there are things that I need to improve and a few things that I will do differently next time, but from nothing to a finished book in a couple of hours didn’t seem too shabby.
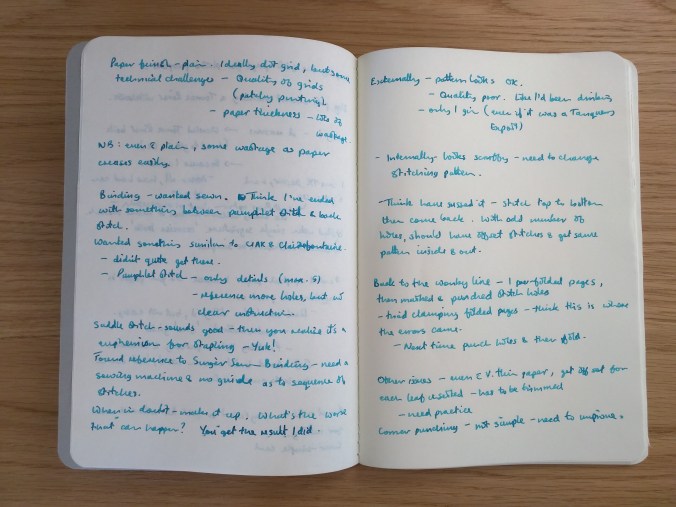
In use, the paper performs as you might expect. Tolerant of lots of pens and inks. Drying times are long and you get show-through, but that’s something I’m happy to live with. The sample of writing I’ve shown was written with a medium-nibbed Sheaffer Legacy (not the Lamy 2000 in the photos), inked with Pilot Iroshizuku ku-jaku – a combination that puts down a pretty wet line. Even so, it was pretty well behaved, coping with my handwriting and showing off the shading you get with this ink.
What next?
I’ll certainly try this again, looking to improve in the areas I’ve highlighted. I also plan to try a multi-signature book at some point. As well as a more complicated binding, this will mean a more elaborate cover, end papers (I have some gorgeous Chiyogami paper that I’m itching to use) etc. It should be fun! After all, what’s the worst that can happen?

I think that look fantastic! Well done.
LikeLike
Thank you!
LikeLike